
How to Fix Smudged, Unscannable Barcodes and Restore Clear Scans
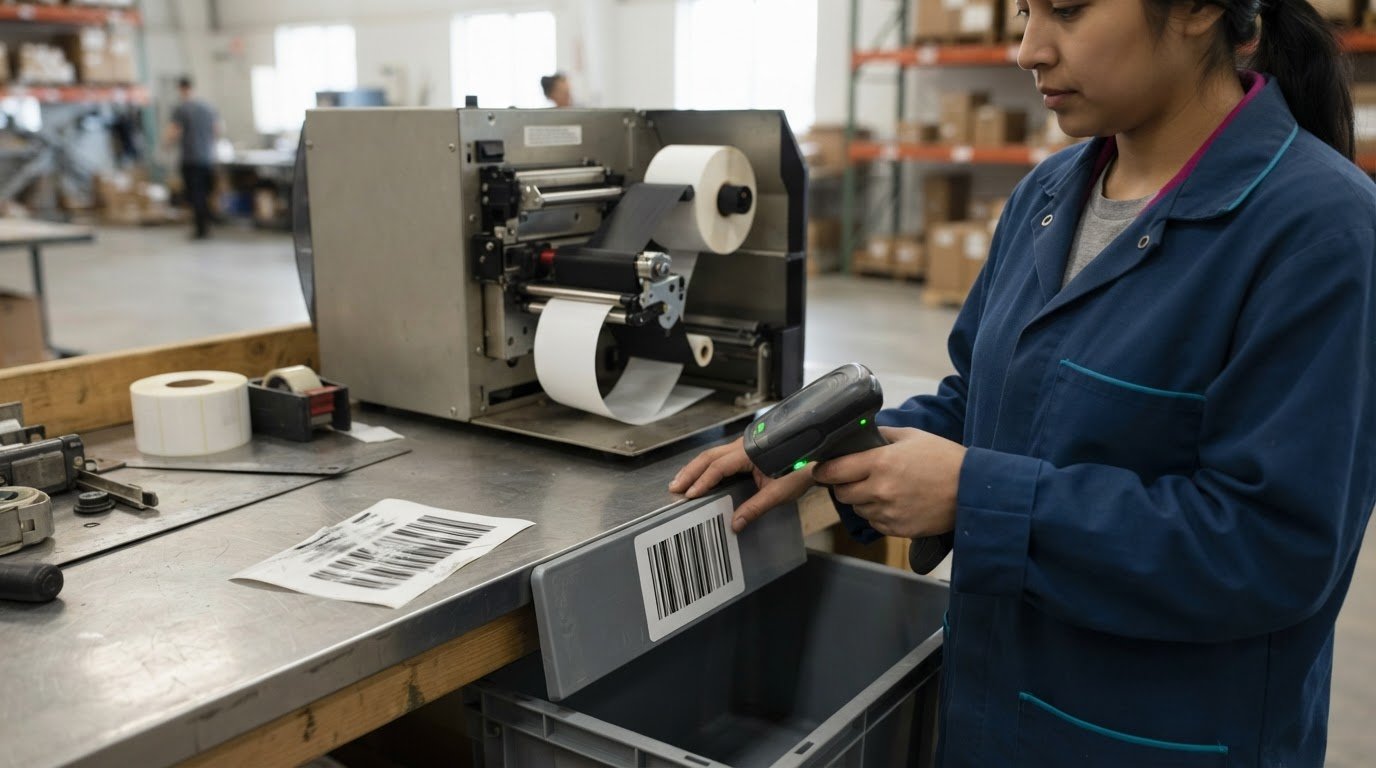
A smudged barcode isn’t always a scanner problem. The defect may start where the thermal-transfer ribbon meets the label. Troubleshooting smudged or unscannable barcodes starts by checking that pairing, then reviewing print darkness and speed before investigating the scanner.
When a barcode looks faded, blurred or marked with white flakes, it’s tempting to assume the printer needs more heat. But excessive heat can widen the bars and shrink the clear spaces between them, making a code harder to read. Label material, ribbon, print settings, and wear during shipping or storage can all affect scan quality.
Work through these checks to isolate the cause and improve scan consistency. Look for abrasion and print defects, review thermal-transfer settings, inspect the scanner, and choose label and ribbon materials suited to the job. Test a fresh label after each adjustment so you can tell what actually improves the result.
Key Takeaways
- Trace smudges and white flakes to the label-and-ribbon combination, print conditions or abrasion during handling.
- Use thermal-transfer printing and suitable ribbon and label stock when labels need to withstand friction or environmental stress.
- Adjust heat and speed methodically; excess heat can widen barcode bars and reduce the spaces scanners need to read.
- Separate print-quality issues from scanner problems by checking scanner compatibility, power, positioning and lens cleanliness.
- Match printer and ribbon choices to the application when recurring print defects point to a materials or equipment mismatch.
Label abrasion during shipping and storage
Inspect labels after printing, then again after shipping or storage. Scuffs, smudges, and white flakes can point to abrasion or a mismatch between the ribbon and label face stock.
-
Inspect and clean labels
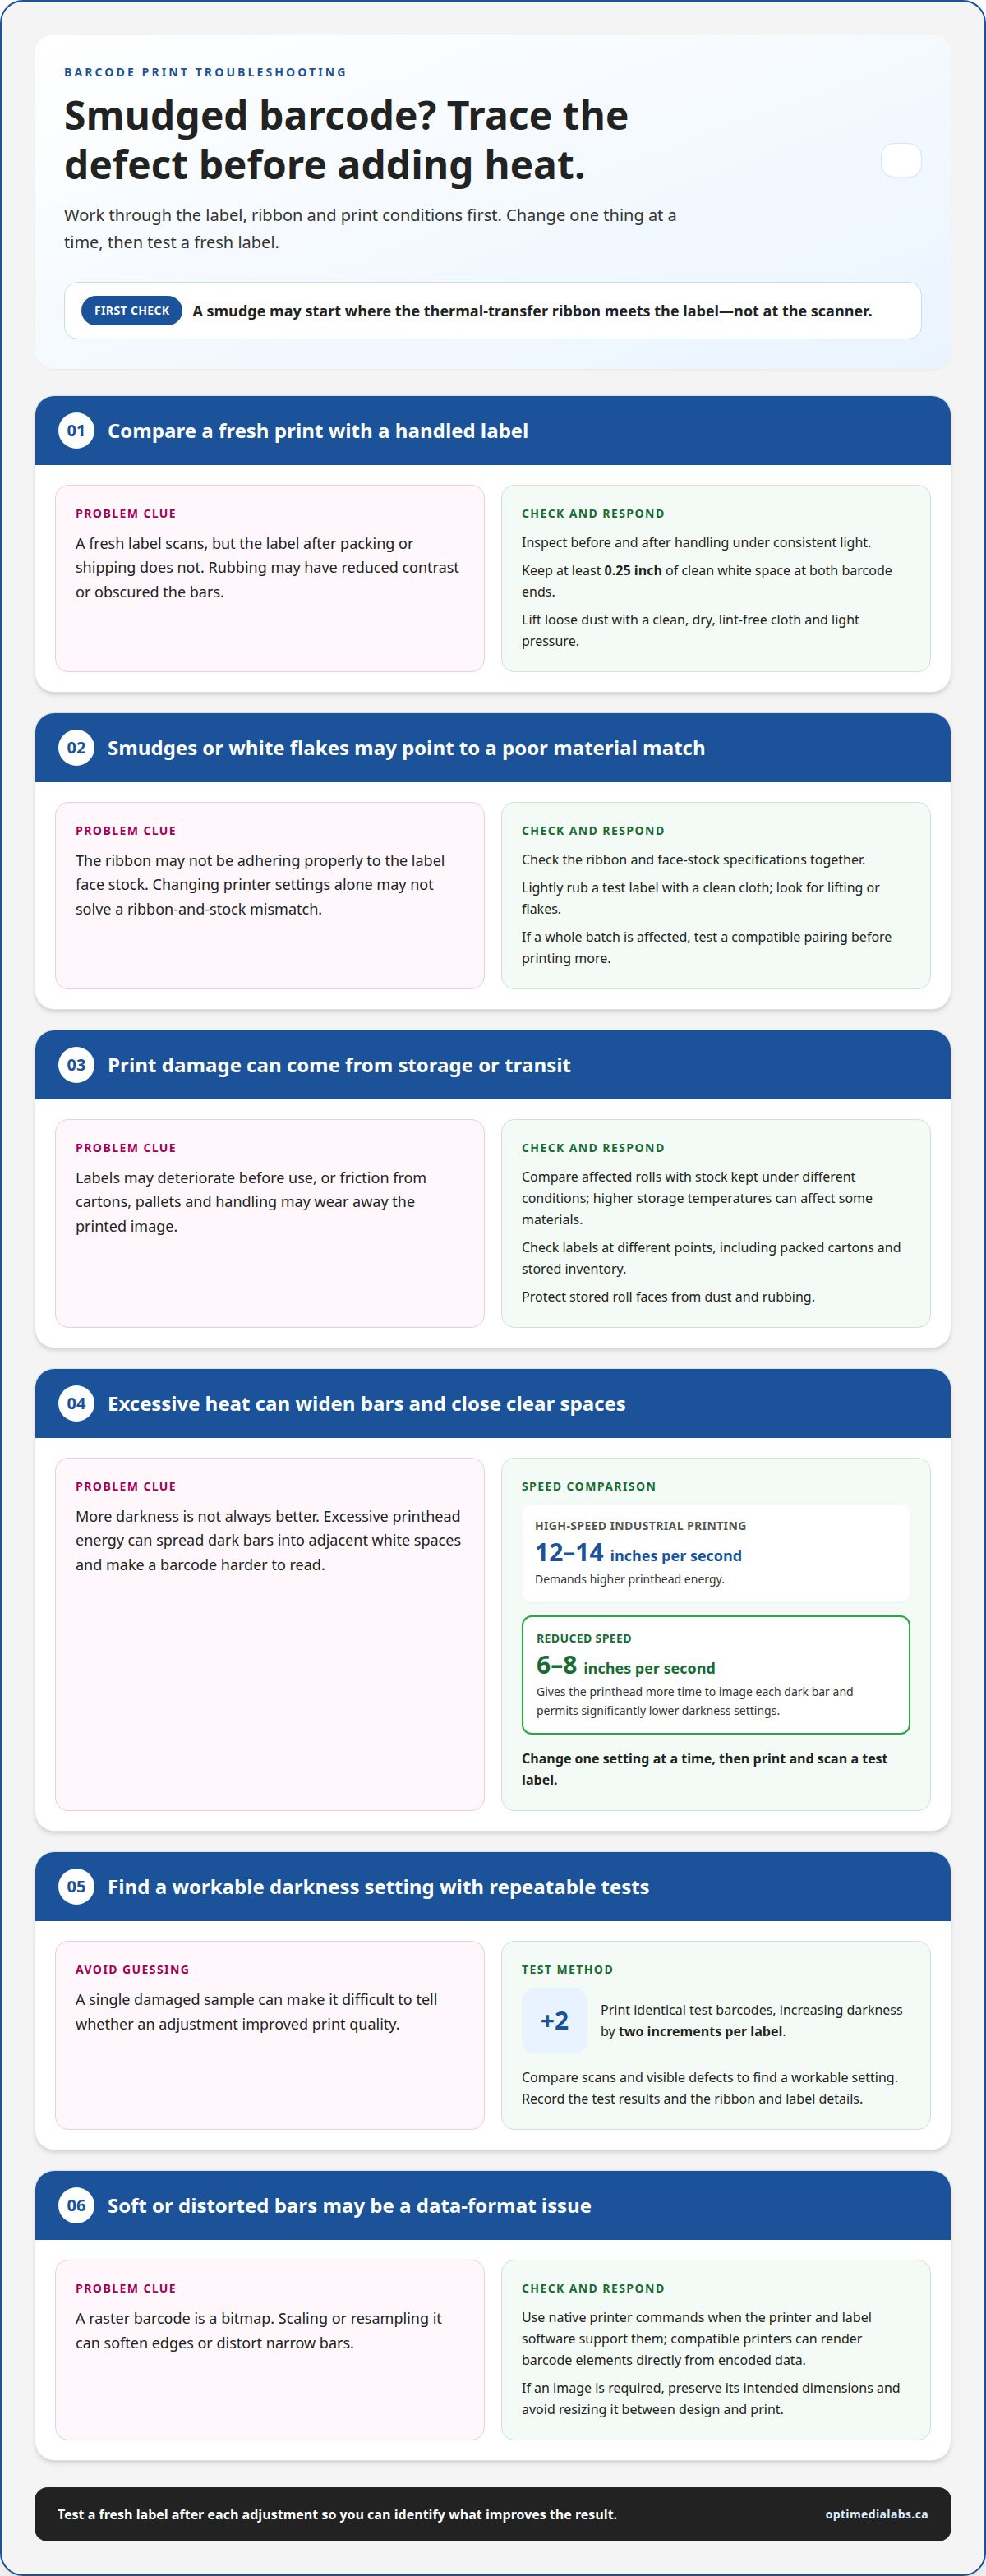
Examine a printed label under consistent light before applying it and after handling. Look for rubbed bars, white flakes, faded areas and marks crossing the barcode’s clear spaces. Keep at least 0.25 inch of clean white space at both barcode ends. Remove loose dust with a clean, dry, lint-free cloth, using light pressure so you don’t add friction or damage the print.
Compare a fresh label with one that has passed through packing and shipping. If the fresh print scans but the handled label does not, abrasion may be reducing contrast or obscuring the bars. Avoid applying cleaning fluids to label stock unless its material guidance allows them, as liquids can affect the face stock or printed image.
-
Check ribbon and face-stock compatibility
Confirm that the thermal-transfer ribbon is intended for the label’s face stock. A poor match can prevent the ribbon from adhering properly, leaving smudges or white flakes. Review the media and ribbon specifications together instead of changing printer settings alone. If defects affect a whole batch, test a compatible combination before printing more labels.
Lightly rub a test label with a clean cloth and check for lifting or flakes. If the image comes away, it may not be bonding well to the face stock. A suitable pairing should keep the barcode bars distinct during normal handling. Record the ribbon and label details with the test results so you can repeat the same combination.
- Assess abrasion after transit and storage. Logistics labels should withstand a reasonable level of rubbing from cartons, pallets and handling. No ISO standards have been adopted by GS1 or retail associations for abrasion resistance, so assess the label against its actual journey. Check labels from different points in the process, including packed cartons and stored inventory. A scratch or friction test can reveal whether contact is wearing away the printed image.
- Review storage conditions if labels deteriorate before use. Higher storage temperatures can adversely affect some label materials. Compare affected rolls with stock kept under different conditions, and note whether damage appears before printing or only after transit. This helps distinguish material deterioration from printer or handling problems.
- Include the printer and stored rolls in the same inspection routine. Keep the printer clean, check that ink levels aren’t too low, and review print speed and label templates when output quality changes. Store rolls with their faces protected from dust and rubbing. Print identical test barcodes, increasing darkness by two increments per label, then compare scans and visible defects to find a workable setting without relying on one damaged sample.
Using thermal-transfer printing to resist smudging
- For labels exposed to rubbing or handling, consider thermal-transfer printing. The printer uses heat to transfer wax, resin, or a combination from a ribbon onto label stock. This can help resist scratching and smudging during normal supply-chain handling. Direct thermal printing uses heat-sensitive labels instead, and its image can degrade in hot environments. Choose a print method based on the label’s surroundings and expected handling.
- Match the ribbon type to the label face stock and application. All-wax ribbons produce the least durable image, while wax-and-resin or resin formulations can suit other durability requirements. Test the combination on the actual label material, then inspect barcode edges and rub resistance. Record the ribbon and stock details with the result so repeat orders use the same tested pairing.
- Set print speed before raising darkness. High-speed industrial printing at 12 to 14 inches per second demands higher printhead energy. Reducing speed to 6 to 8 inches per second gives the printhead more time to image each dark bar and permits significantly lower darkness settings. Change one setting at a time, then print and scan a test label. Excessive energy can spread bars into adjacent white spaces.
- Send barcode data in a format your printer can handle cleanly. Native printer commands let compatible printers render barcode elements directly from encoded data. A raster image is a bitmap, and scaling or resampling it can soften edges or distort narrow bars. Use the native command when the printer and label software support it. If the workflow requires an image, preserve its intended dimensions and avoid resizing it between design and print.
- Work with a print-media supplier when test labels fail under actual conditions. Share the face-stock type, ribbon formulation, printer model, print speed and exposure to friction, heat or chemicals. These details help narrow the material choice for a particular supply chain. For a system using this method, compare the workflow with suitable thermal-transfer label printers. If media selection remains unclear, get guidance on matching print media to the application.
Thermal-transfer printing can help prevent barcode scratching and smudging and resist stresses such as extreme temperatures and chemical exposure. This can matter when labels face both handling and demanding conditions. Consider the label’s environment and durability requirements, then assess the ribbon and stock pairing against them.
Ribbon cost is another consideration when balancing durability. All-wax thermal transfer ribbons provide the least durable image and are normally less expensive than other ribbon types. That trade-off makes it useful to weigh the required image durability against ribbon cost, rather than treating either as the only selection criterion. The page recommends working with a print-media provider to find a suitable and economical solution for a particular supply chain. Discuss the application requirements with the provider and consider the available media options in light of both performance needs and cost. This can help keep the material choice suited to the supply chain while accounting for economy.
Heat, friction, and high-speed scanning conditions
- Inspect printed bars with a 10-power optical loupe or linen tester. For troubleshooting smudged or unscannable barcodes, look for edges that spread sideways, uneven widths, gaps or small voids. Heat increases each bar element’s thickness, so a dark code may still scan poorly. Compare a sample with the printer’s normal output and note whether defects repeat across labels. Consistent widening points to a print setting; isolated damage may indicate contact during handling.
- Reset print darkness to the factory baseline before testing heat. The baseline is typically midway on a 30-point scale. From there, print a stepped test and change heat in controlled increments. If lateral ink blooming appears, lower printhead heat by three to four increments, then inspect and scan another label. Record each setting beside its sample. This helps identify the lowest heat level that keeps bars clear and readable.
- Distinguish heat defects from friction damage by checking where marks appear. Bars that broaden consistently across a fresh roll suggest excessive heat; scratches or rubbed patches concentrated at contact points suggest mechanical wear. Inspect labels after they pass through guides, applicators, or conveyor contact. If one side repeatedly shows damage, check that path for rubbing instead of increasing darkness. More heat can thicken bars and shrink the spaces between them.
- Test barcode orientation when a high-volume process repeatedly wears the same edges. Rotate the barcode by 90 degrees and compare samples from the same production conditions. The change alters mechanical wear patterns and defect tolerance, so the revised orientation may expose a different part of the bars to contact. Keep the barcode’s size and print settings consistent during the comparison. Otherwise, orientation isn’t the only changed variable.
- Test fixed scanners under the conditions where they’ll be used. Adjust distance, angle, and lighting, then run labels through the normal path to check for consistent reads. A scanner that reads a stationary sample may struggle when a label moves or reflects light differently. For handheld scanners, test different distances and angles with the actual label. Keep scanner position and lighting steady while comparing samples, so they don’t obscure changes in print quality.
- Keep a short record of each test. Include the darkness setting, heat change, barcode orientation, scanner position, and whether the label was fresh or handled. Compare the barcode’s appearance through a loupe with the scan result. This makes troubleshooting smudged or unscannable barcodes more systematic if the defect returns. If the image looks clean but scans remain inconsistent, test scanner angle, distance, or lighting next.
Causes of smudging and white defect marks
- Map each defect before changing a setting. Record whether the mark is dark smudging, a white streak, a small void, or a rubbed patch. Note whether it repeats in the same position across several labels. A repeated white mark may point to a print-path or printhead issue, while scattered scratches may appear after handling. Photograph or keep affected samples beside a clean label for comparison.
- If white gaps repeat across consecutive labels, inspect the thermal printhead. Dust or residue on its ceramic heating element can interfere with image formation. Clean it with a lint-free pad dampened with pure isopropyl alcohol. Follow the printer’s cleaning procedure and let the component dry before printing again. Print a fresh barcode, then compare the same area across several labels to see whether the gaps remain.
- Separate ribbon-transfer faults from isolated print defects. Smudging or white flakes can occur when a thermal-transfer ribbon doesn’t adhere properly to the label face stock. Review the ribbon and stock pairing, then print a test on compatible media. If the defect repeats, record the materials and printer settings together. This gives you a useful comparison as you change one variable at a time.
- Check print darkness and speed when bars look thick or blurred. Excessive thermal printing can widen barcode bars by 15 to 20 percent, reducing the white spaces between them. Print a sample at the current setting, then adjust darkness or speed separately. Compare bar edges and spaces before scanning. Avoid increasing darkness simply because a barcode looks faint, since excess heat can cause the opposite problem.
- Match printer resolution to the barcode’s use and detail. Thermal printers commonly use 203, 300 or 600 dots per inch. A 203-dpi format suits transport cartons and pallet placards; 300 dpi suits high-density barcodes and regulatory tracking labels. Miniature electronics and medical specimen containers use 600 dpi. If converting a 203-dpi label format for a 300-dpi printer, account for a scaling ratio of roughly 1.47. Incorrect scaling can alter bar dimensions.
- Rule out scanner mismatch before changing a clean print. Confirm that the scanner supports the barcode type, such as 1D or 2D, and that the printed size falls within its supported range. A scanner may fail on a barcode it cannot decode, even when the bars look clear. Maintain the printer by cleaning it, checking ink levels, and reviewing print speed and label templates when output changes.
Cleaning a smudged scanner lens
- Compare a clean, newly printed barcode with the same label after a failed scan. If both fail in the same way, inspect the scanner lens before changing print settings. Dust and fingerprints can interfere with scanning even when the bars appear sharp. Note whether the problem affects every label or just one batch. This comparison helps distinguish scanner contamination from a damaged barcode.
- Under good lighting, check the lens for fingerprints, dust, adhesive residue, or a visible smear. Move the scanner slightly to see whether the mark stays on the lens or appears on the label. A mark fixed on the scanner points to lens contamination; one that moves with a label points to its printed surface. Don’t scrape at residue, as this can leave fresh marks.
- Gently clean the lens with a suitable cloth to remove dust or fingerprints that may interfere with scanning. Apply the cleaner to the cloth rather than spraying it into the scanner housing. Wipe the lens gently, using a clean section of cloth for the final pass. Avoid paper towels or rough fabric, which can leave fibres or scratch the surface. Follow the scanner manufacturer’s cleaning instructions if they specify another method.
- Inspect the lens again under the same lighting. Look for streaks, lint, or remaining fingerprints. If cleaner leaves a visible film, buff gently with a dry area of microfiber. Don’t press hard or use a sharp tool near the lens. A clear surface helps the scanner read barcodes consistently.
- Test the cleaned scanner with a fresh label and a known readable barcode. Keep the label flat and steady during the comparison. If the fresh label scans but a marked one does not, inspect the marked label’s bars and contrast. If several clean labels still fail, lens contamination may not be the only cause. Separate print defects from scanner performance before making further changes.
- Record what changed after cleaning, including the label tested and whether the scanner read it. If the lens looks clear but scans remain inconsistent, check the scanner’s supported barcode type and confirm its drivers and firmware are current. A cordless unit also needs sufficient battery charge; a connected unit needs a working power source and intact cables. For recurring scanner or barcode issues, contact the team for help narrowing down the cause.
Check whether the barcode’s printed size is within the range supported by the scanner. Labels that are too large or too small may not scan properly. Updated scanner drivers and firmware may help resolve scanner issues. For a cordless scanner, check that the battery has sufficient charge; for a connected scanner, check the power source and inspect cords and wires for breaks or wear.
During installation, test distance, angle, and lighting to help fixed barcode scanners read consistently. With a handheld scanner, identify suitable scanning distances and angles through use. If the issue appears to originate in printing rather than the lens, clean the ceramic printhead heating element with a lint-free pad dampened with pure isopropyl alcohol.
OptiMediaLabs Canada
OptiMediaLabs Canada is a next step when recurring barcode defects point to a mismatch between printing equipment, ribbon and label requirements. Its range includes Afinia Color Label Printers, RFID Label Printers, Afinia Label Cutters & Finishers and Thermal Transfer Ribbons. These options are relevant when you’re replacing equipment or selecting ribbon for a thermal-transfer workflow, rather than trying another untested print setting.
Use the checks in this guide to identify whether the issue follows the label, printer or scanner. Then consider whether different printing equipment or ribbon better suits the label’s handling and storage conditions. For a straightforward next step, contact OptiMediaLabs Canada about your barcode printing requirements.
Make clear scans part of the workflow
Turn the fix into a repeatable checkpoint. After resolving a barcode issue, use a known-good label and scanner to confirm the workflow is working as expected. Record the approved materials and printer settings alongside the process so the next production run has a clear starting point. This makes troubleshooting smudged or unscannable barcodes more systematic if the defect returns.
If scan failures continue across fresh labels, treat the pattern as useful diagnostic information. The label, printer and scanner each play a role, and a persistent issue may call for a closer look at the equipment or supplies used together. OptiMediaLabs Canada offers a wide selection of supplies to support reliable label-printing workflows.
For help considering the next step for your barcode setup, contact OptiMediaLabs Canada. A clear process can help your team move forward with confidence.
Frequently Asked Questions
What causes barcodes to look smudged or fail to scan?
Barcodes can fail because the printed image is distorted, the encoded data is incorrect, or the scanner can’t interpret that barcode format. To isolate a less obvious cause, compare the digits or text encoded in the label with the identifier entered in your system. If the printed code looks intact but returns the wrong record, investigate the data or barcode-generation settings rather than adjusting printer darkness.