
How to Print Clear Barcode Labels: A Professional Guide for Canadian Businesses
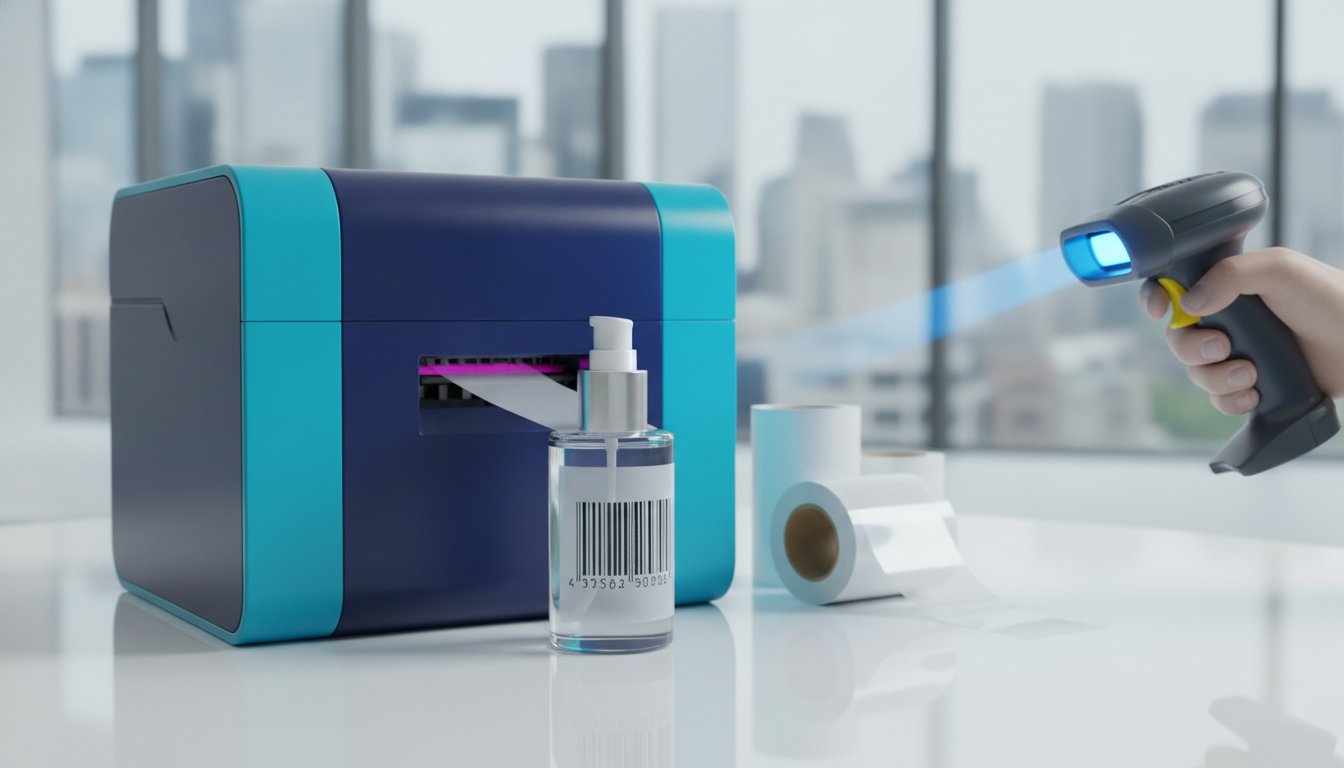
A barcode that looks professional but fails to scan at the checkout is a liability, not an asset. If you have struggled with scanners rejecting labels on glass or metal surfaces, you already know that transparency adds a significant layer of technical difficulty. Learning how to print clear barcode labels requires more than just the right media. It demands a system approach that balances ink opacity with the underlying product colour to ensure high contrast.
You want a sleek aesthetic that doesn't compromise your logistics reliability. This guide provides a professional framework for mastering scannable transparent labels in-house. We will examine the critical differences between inkjet and thermal transfer technology for clear substrates and help you organize a repeatable workflow. By the end of this article, you'll understand how to meet ISO/IEC 15416:2025 standards while maintaining the premium look your brand requires.
Key Takeaways
- Understand the reflectance principle and why high-contrast printing is essential for barcodes on dark product colours or reflective surfaces.
- Compare the capabilities of inkjet and thermal transfer systems to select the most efficient hardware for transparent media.
- Master the professional workflow of how to print clear barcode labels by correctly configuring media sensors and ink opacity settings.
- Achieve a premium "no-label" look while maintaining logistics reliability through proper quiet zone management and high-resolution graphics.
- Implement finishing solutions like lamination and custom label cutters to protect your barcodes from smudging and environmental wear.
Understanding the Challenge of Clear Barcode Labels
Clear barcode labels serve a specific purpose in modern Canadian packaging. They allow the product’s natural colour and texture to remain the focal point while providing necessary data. This "no-label" look is a standard requirement for premium cosmetics, nutraceuticals, and the craft beverage sector. While the visual appeal is high, the technical execution is demanding. A standard Barcode relies on the contrast between dark bars and a light background to function. When the background is transparent, that contrast becomes variable and potentially unreliable.
The primary technical hurdle involves maintaining scannability across different surfaces. A label that scans perfectly on a clear water bottle might fail on a dark green wine bottle. Understanding how to print clear barcode labels involves accounting for the light-reflectance of the product itself. Without a solid white backing, the scanner's ability to distinguish between spaces and bars is compromised by the contents of the container.
Why Traditional Printing Logic Fails on Transparent Media
Standard office printers aren't designed for non-porous, clear substrates. They often produce "ghost" barcodes where the ink is too thin to block light effectively. This lack of ink density is a major failure point. If the scanner’s light passes through the dark bars rather than reflecting off them, the scan fails. Canadian logistics centres use high-speed automated sorters that require instant reads. Poorly printed clear labels lead to rejected shipments and costly manual processing fees. You need specialized hardware, such as Afinia Color Label Printers, to achieve the necessary opacity on plastic media.
The Aesthetic vs. Functional Balance
Designers must balance the desired "clear space" with the functional requirements of the hardware. Choosing between matte and gloss transparent finishes affects how light hits the sensor. Gloss finishes offer a seamless look on glass but can cause glare issues for certain handheld scanners. Matte finishes reduce glare but may slightly dull the product's visibility through the label. You must realize that the product colour behind the label acts as the functional background for the scanner.
To maintain this balance, follow these design principles:
- Maintain the Quiet Zone: Ensure the space around the barcode remains completely free of text or graphics to prevent interference.
- Test on Final Packaging: Always test your labels against the actual product container, not just a white sheet of paper.
- Prioritize Opacity: Use high-pigment inks or resin ribbons to ensure the bars remain opaque regardless of the background.
This methodical approach ensures your packaging remains both beautiful and compliant with retail standards. By treating the clear label as a technical component rather than just a sticker, you avoid the common pitfalls of industrial scanning failures.
The Science of Contrast: Ensuring Scannable Barcodes
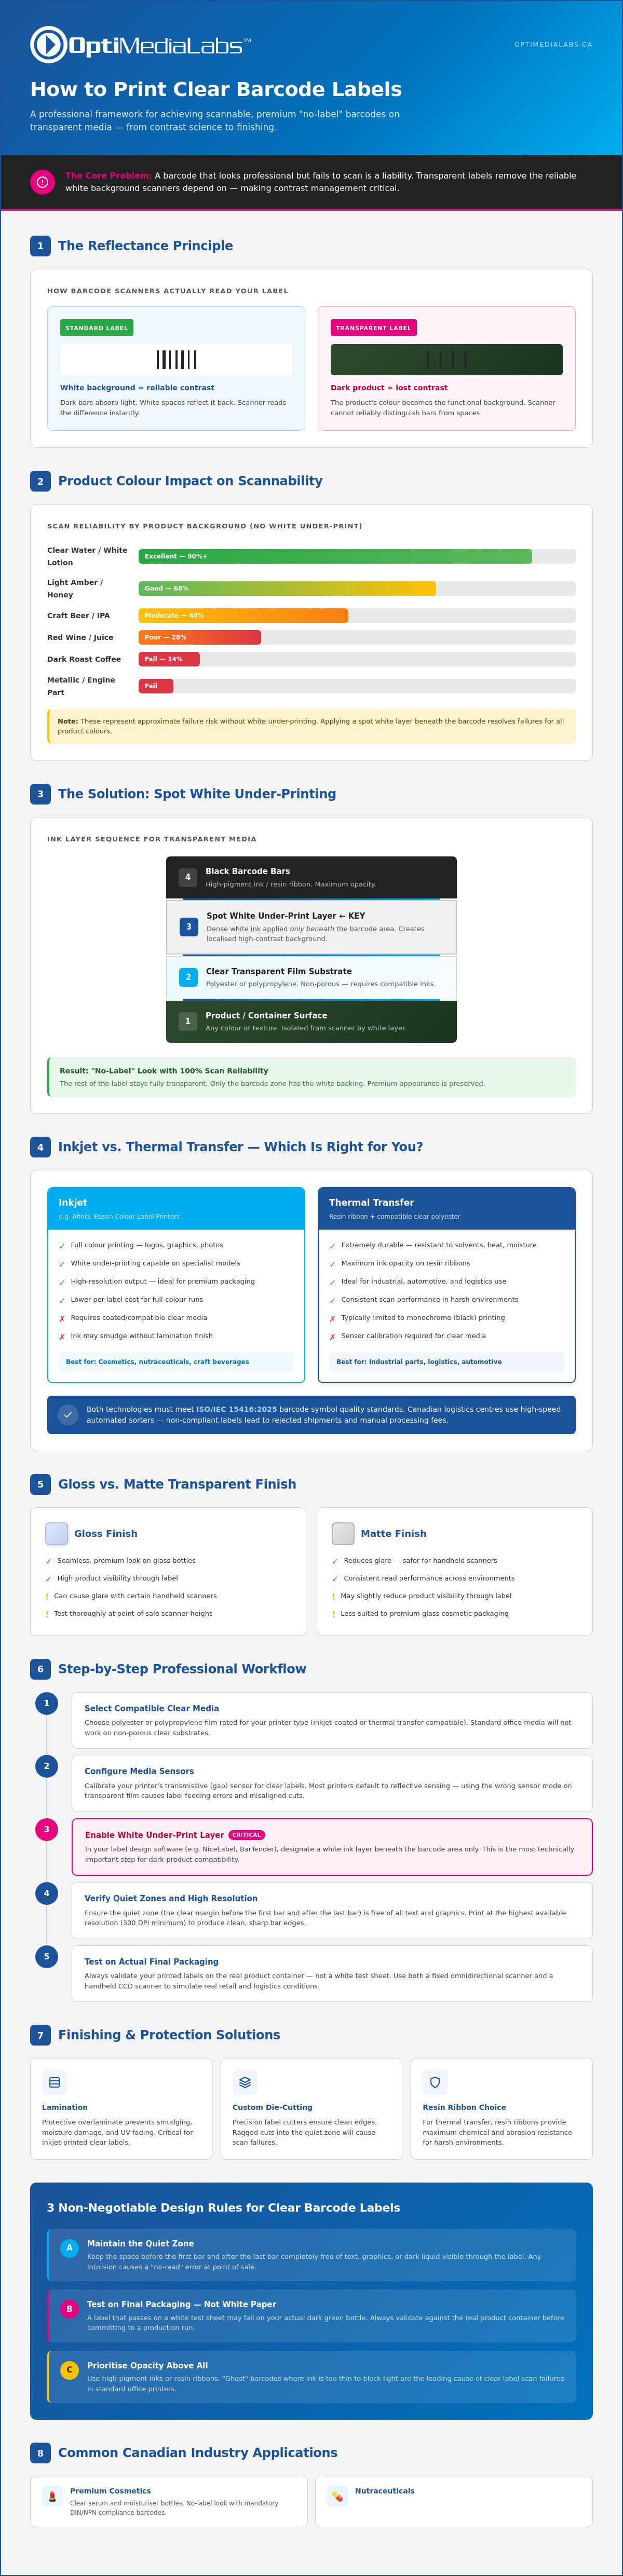
Barcode scanners do not actually "see" the colour of your label. Instead, they measure the difference in light reflectance between the bars and the spaces. This is known as the reflectance principle. In a standard setup, dark bars absorb the scanner's light while the white background reflects it back to the sensor. When you are learning how to print clear barcode labels, the transparent substrate removes that reliable white background. This makes the scanner's job significantly harder because the product inside the container becomes the functional background.
Technical compliance relies on the "Quiet Zone." This is the clear, unobstructed space preceding the first bar and following the last bar of a barcode symbol. On transparent media, this zone must be even more strictly guarded. Any text, graphics, or dark liquid visible through the quiet zone will cause a "no-read" error at the point of sale. To ensure global compatibility, Canadian businesses should consult the GS1 General Specifications for precise measurements on symbol quality and contrast ratios.
Solving the Background Colour Problem
Printing directly onto clear film works well for light-coloured products like clear water or white lotions. However, if your product is a dark roast coffee, a red wine, or a metallic engine part, the barcode will likely fail. Professional systems from manufacturers like Afinia and Epson solve this through white under-printing. These printers apply a dense layer of white ink specifically beneath the barcode area before laying down the black bars. This creates a localized, high-contrast background that ensures scannability while keeping the rest of the label transparent. You can realize a high-contrast ratio without covering your entire product by using this "spot white" technique. If you are unsure which hardware supports this feature, you can speak with a technical specialist to review your specific packaging needs.
Testing for Scanability Before Production
A common mistake is testing labels with a smartphone or a basic handheld scanner. These devices are often too "forgiving" and don't reflect the strict requirements of industrial sorters. A true barcode verifier measures the symbol against ISO/IEC standards, checking for modulation and defects. If your verifier reports a "low contrast" error, it means the difference between your bars and the background is too narrow. For 2026 compliance standards, Minimum Reflectance is defined as the requirement for light spaces to reflect at least 25% more light than the dark bars to achieve a passing Grade C. Mastering how to print clear barcode labels requires this level of precision to avoid retail chargebacks and supply chain delays.
Choosing the Right Hardware and Software Systems
Selecting the correct technology is the first step in mastering how to print clear barcode labels. You generally choose between inkjet and thermal transfer systems based on your specific application. Inkjet printers, particularly Afinia Color Label Printers, are ideal for high-resolution retail packaging where vibrant graphics must coexist with scannable codes. These systems use specialized ink delivery to maintain crisp edges on non-porous clear film. Conversely, thermal transfer technology remains the centre of high-durability warehouse labeling. It uses heat to melt a ribbon onto the label surface, creating a bond that resists chemicals and abrasion.
Regardless of the printer type, you must use brand-specific consumables. Generic inks often fail to bond with transparent plastic, leading to ink flaking or "spidering" where the barcode lines bleed into the clear spaces. This degradation makes it impossible to meet ISO print quality test specifications, resulting in failed scans at the retail level. Using matched components ensures that the dark bars remain opaque and the edges stay sharp over the life of the product.
Professional Barcode Software: BarTender and NiceLabel
Many small businesses attempt to use Excel or basic design tools, but these lack the precision required for industrial symbology. BarTender software is superior because it generates barcodes as vector-based objects rather than low-resolution images. This ensures the bars remain perfectly sharp even at small sizes. If you need to manage variable data, such as unique serial numbers across thousands of clear rolls, BarTender handles the database integration seamlessly. For larger Canadian manufacturers, NiceLabel provides automation tools that ensure every label meets specific regulatory compliance standards automatically. These professional suites allow you to realize complex layouts without sacrificing barcode integrity.
Consumables: Matching Ink and Ribbons to Clear Film
The substrate dictates the consumable. If you use a thermal transfer printer, selecting the right thermal transfer ribbons is critical. For clear synthetic labels, a full resin ribbon is usually necessary to ensure the print doesn't smudge off the plastic. If the label will be exposed to moisture or oils, pigment-based inks in an inkjet system provide the best longevity. Always verify that your Afinia labels are specifically matched to your printer model to guarantee the ink or ribbon will adhere properly to the transparent surface. This technical alignment is what separates professional results from logistics failures.
Step-by-Step: How to Print Clear Barcode Labels
Mastering the technical workflow for transparent barcodes requires a methodical approach to both software and hardware. Successfully learning how to print clear barcode labels involves more than just loading the media. You must align your design files with the specific physical properties of the clear substrate. Follow this professional process to ensure your labels meet industrial standards for scannability and durability.
Designing for Transparency
Start by preparing high-resolution artwork in a professional design suite. You must define a "Spot White" or "White Layer" in your software if your printer supports white under-printing. This layer acts as a localized background, telling the printer exactly where to apply opaque white ink before laying down the black barcode bars. Avoid using extremely thin lines or hair-line graphics. These can appear broken or "ghosted" on textured clear film. Ensure the barcode is oriented correctly for the print head direction. A "picket fence" orientation (vertical bars) is generally preferred for high-speed printing to prevent "smearing" that can occur with "ladder" orientation (horizontal bars).
Printer Calibration for Clear Media
Standard sensors often fail to detect the start and end of clear labels because the light passes straight through the media. To fix this, you must configure your printer driver for "Transparent/Clear" media sensing. Most professional clear labels utilize a "Black Mark" on the back of the liner. If your roll lacks this mark, you must use "Transmissive" sensors. These sensors measure the difference in light transmission between the label and the gap. Run the printer’s manual calibration routine to realize perfect alignment and prevent frustrating "No Paper" or "Media Out" errors.
Once calibrated, follow these final production steps:
- Adjust Print Speed: Reduce the speed to 2 or 3 inches per second. This ensures the ink or ribbon has enough time to bond with the plastic substrate without smudging.
- Perform a Test Print: Print a single label and verify its scannability with multiple devices. Do not rely on a single scanner, as different sensors have varying sensitivity to transparency.
- Scale Production: After verification, utilize roll-to-roll systems to manage high-volume runs. This prevents the clear labels from touching or sticking together before the ink is fully cured.
If you encounter calibration issues or need help configuring your specific driver for clear media, contact our technical support team for direct assistance with your hardware setup.
Finishing and Troubleshooting Your Clear Labels
The final stage of learning how to print clear barcode labels involves moving from the raw print to a finished, shelf-ready product. Printing the image is only half the battle. To realize a truly professional "no-label" look, you must master the finishing process and implement a rigorous quality control check for every production batch. This ensures that the sleek aesthetic you've created remains functional throughout the entire supply chain.
Post-Print Finishing Techniques
Digital die-cutting is often superior to using pre-cut labels when working with transparent substrates. Using Afinia label cutters and finishers allows you to create custom shapes that follow the contours of your artwork, minimizing the visible edges of the label. When removing the "matrix," or the waste material around your labels, maintain consistent tension. Clear synthetic films are stronger than paper but can stretch if pulled too aggressively, which might distort the barcode geometry.
Application is the next hurdle. A common issue with clear labels is "silvering," where tiny air bubbles trapped under the adhesive create a cloudy appearance. To avoid this, use a firm applicator or roller to ensure the adhesive wets out completely against the glass or plastic surface. This maximizes transparency and ensures the background contrast remains stable for the scanner.
- Lamination: Add a clear over-laminate if your product will be handled frequently or exposed to chemicals. This protects the barcode from smudging and abrasion.
- Batch Testing: Scan the first and last label of every roll. If the first scans but the last fails, your print head may need cleaning or your ribbon tension might be drifting.
- Matrix Removal: Ensure your finisher is calibrated to cut deep enough to separate the film but not so deep that it scores the liner.
Troubleshooting Scannability Failures
It's frustrating when a barcode scans perfectly on the roll but fails once applied to a bottle. This usually happens because the product colour or reflections from the container are interfering with the contrast ratios discussed earlier in this guide. If you see "voids" or white spots in the black bars, your print head is likely dirty or failing. Conversely, if the bars look "fat" or blurry, you may have too much ink or heat. When using thermal label printers, you must balance the "Heat" or "Darkness" settings to ensure the ribbon melts cleanly without bleeding.
To fix Bar Width Growth, reduce the print head temperature or adjust the "bar width reduction" setting in your software to compensate for ink spread. By following these methodical steps, you can establish a repeatable in-house workflow that produces high-contrast, scannable transparent labels every time.
Master Your In-House Clear Label Production
Achieving a high-end "no-label" aesthetic doesn't have to mean sacrificing scannability. You've learned that mastering how to print clear barcode labels requires a technical balance between ink opacity, substrate transparency, and surface contrast. By selecting specialized Afinia or Epson hardware and utilizing professional design suites like BarTender or NiceLabel, you can realize a repeatable in-house workflow that meets strict ISO and GS1 standards. This precision protects your brand from retail chargebacks and ensures your products move through the Canadian supply chain without delays.
OptiMediaLabs is here to facilitate your transition to professional-grade labelling. As an authorized distributor for Afinia, Epson, and Zebra, we provide expert advice on software integration and offer national shipping on all consumables from our Canadian-based support centre. Browse our professional barcode printers and software for your Canadian business to start producing high-contrast, scannable transparent labels today. Your path to reliable, beautiful packaging is just a consultation away.
Frequently Asked Questions
Can I print clear barcode labels with a regular home inkjet printer?
Regular home inkjet printers are unsuitable for professional clear labels because they typically use dye-based inks that fail to bond with synthetic surfaces. These printers lack the precise ink delivery required for high-opacity bars, leading to "ghosting" or barcodes that scanners cannot read. You need industrial hardware like Afinia or Epson systems to ensure the ink remains durable and scannable on non-porous clear film.
Why does my barcode scan on paper but not on a clear label?
Scanners fail on clear labels because the transparent background removes the necessary contrast provided by white paper. When you learn how to print clear barcode labels, you must realize that the product inside the container acts as the background. If the liquid or container is dark, the scanner cannot distinguish the bars from the spaces. This results in a "no-read" error despite the barcode appearing perfect to the eye.
What is the best software for designing clear barcode labels in Canada?
BarTender and NiceLabel are the industry standards for Canadian businesses. These professional suites generate vector-based barcodes that maintain perfect sharpness at any scale, unlike standard office software. They also allow for seamless integration of variable data and GS1 compliance. Using these tools ensures your labels meet the technical specifications required by major Canadian retailers and logistics centres.
Do I need a special sensor to print on clear label rolls?
Yes, you require either a transmissive sensor or a black mark sensor. Standard reflective sensors often fail to detect the gaps between clear labels because the light passes through the media. Most professional clear rolls feature a black mark on the liner to facilitate accurate registration. Without the correct sensor configuration, your printer will likely trigger a "media out" error during production.
Which thermal transfer ribbon is best for transparent plastic labels?
Full resin ribbons are the only reliable choice for transparent plastic or synthetic labels. These ribbons require higher heat settings but create a permanent bond that resists chemicals, moisture, and extreme temperatures. Wax or wax-resin ribbons will smudge or flake off clear media almost immediately. Matching a high-quality resin ribbon with your specific substrate is essential for maintaining long-term barcode integrity.
How do I prevent my ink from smudging on clear glossy labels?
Prevent smudging by using pigment-based inks and slowing your print speed to allow for better adhesion. Pigment inks are more stable on glossy surfaces than dye-based alternatives. Additionally, ensure your printer's "darkness" or "heat" settings are optimized for the specific media. If your environment involves heavy handling, applying a clear laminate after printing provides an extra layer of protection against environmental wear.
Is white ink necessary for clear barcode labels?
White ink is necessary whenever you are applying clear labels to dark or metallic containers. By printing a white "spot" layer beneath the barcode, you create an artificial background that mimics white paper. This localized contrast ensures the scanner can read the code regardless of the product's colour. Professional Afinia and Epson systems utilize this white-under-printing technique to solve the reflectance problem on transparent media.
What are the GS1 Canada requirements for barcode contrast on packaging?
GS1 Canada requires barcodes to meet specific ISO/IEC 15416:2025 print quality standards, typically requiring a Grade C or higher. The primary requirement is a minimum reflectance difference of 25% between the light spaces and the dark bars. Understanding how to print clear barcode labels correctly is the only way to guarantee these contrast ratios are met. Failure to comply can lead to rejected shipments and significant retail chargebacks.